How to do it...
For configuring display filters, you can choose one of the preceding methods mentioned.
To use the filters menu, do the following:
- For choosing from the filters menu, go to the display filter pane at the top of the window and click on the Expression... button as you see in the following image:

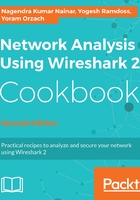
- When you click the Expression... button, the following window will open:

There are four important panes in the Display Filter Expression window:
- Field Name: In this window, you configure the filter parameter. You can scroll down by typing the protocol name, and get to the protocol parameter by clicking on the (+) signs at the left of the list.
Type the letters ipv4 to get to the IPv4 protocol, click on the (+) sign to see the protocol parameters (or click on Enter twice), and choose ip.addr to filter a specific IP address.
Example 2
Type the letters tcp to get to the TCP protocol, click on the (+) sign to see the protocol parameters, and choose tcp.port for source or destination port number.
- Relation: This is the pane that you choose the operator from. You can choose == for equal, != for not equal, and so on.
Type the letters sip to get to the SIP protocol, choose sip.Method, and from the Relation window choose == . In the value window, type invite . This will filter all SIP invite met hods.
- Value: Here, you choose the value of the field that you chose before.
Type the letters tcp to get to the TCP protocol, click on the (+) sign to see the protocol parameters, choose tcp.flags.syn for a TCP SYN flag, and in the Value field choose 1.
- Predefined values: When the value of the field you chose is not Boolean, there might be a list of options in this field.
Under TCP, there is a field tcp.option_kind . This option relates to TCP options (for more details go to Chapter 11, Transport Layer Protocol Analysis). You will get a list of the values that are possible here.
- Search: A search mechanism that enables you to search for filter expressions. In the search box you should write exactly what you are looking for. You can see it, for example, in the following screenshot—when you search for ip fragment, it brings up OpenFlow and Cisco NetFlow expressions:

When writing ipv4 fragment it will show what we need, that is, IPv4 fragments, as you can see in the following screenshot:

Writing the syntax directly into the filter window is performed as follows:
- After you get used to the display filters syntax, you might find it easier to type the filter string directly into the filter window, as you see in the following screenshot:

- In this case, when you write a filter string into the window, the window will light up in one of the following three colors:
- Green: This is when the filter is correct and you can apply it.
- Red: This is a wrong string. Fix the string before you apply it.
- Yellow: Whenever you use the != operator, the display filter area will become yellow. It doesn't mean your filter will not work—it is just a warning that it may not work.
- To apply the filter, click on the right arrow to the right of the filter string window, or use Enter.
- To choose from previously-defined filters, use the scroll-down to the right of the apply arrow.
- To configure filter preferences and filter expressions, click on the symbol to the left of the filter window, as you can see in the following screenshot:

- Choosing Manage Display Filters enables you to add filters for future use (for example, for specific profiles).
- Choosing Manage Filter Expressions enables you to add filter expressions that will appear to the right of the filter window, for more convenient usage of them.
Using the packet pane and defining it as a filter is as follows:
This is a very convenient option. You can choose any field from the packet detail pain in the captured file, right-click it, and you will get the following options, as illustrated in the following screenshot:

The options are:
- Apply as Filter: This will set a filter according to the field you chose, and apply it to the capture data.
- Prepare a Filter: This will prepare a filter, but not apply it. It will be applied when you click the Apply button on the right-hand side of the filter window.
In both options, you can choose to configure a filter:
- Selected: This will choose the selected field and parameter
- Not selected: This will choose the not selected fields and parameters
For example, right-clicking on the http.request.method field and choosing Selected will show the filter string http.request.method == GET, while choosing Not selected will show the string !(http.request.method == "GET").
You can also choose the options and selected, or selected, and not selected, and or not selected for structured filters.